
How to Create Glassmorphism in PowerPoint
Attention designers!
You don’t necessarily need fancy creative software to create pro-level designs. In this blog I will walk you through my process in designing this popular frosted glass effect using one of the most universal software out there: Microsoft PowerPoint!
Create your first glass object
Insert a blank slide.
Set background color to linear-diagonal gradient fill in two colors of your choice.
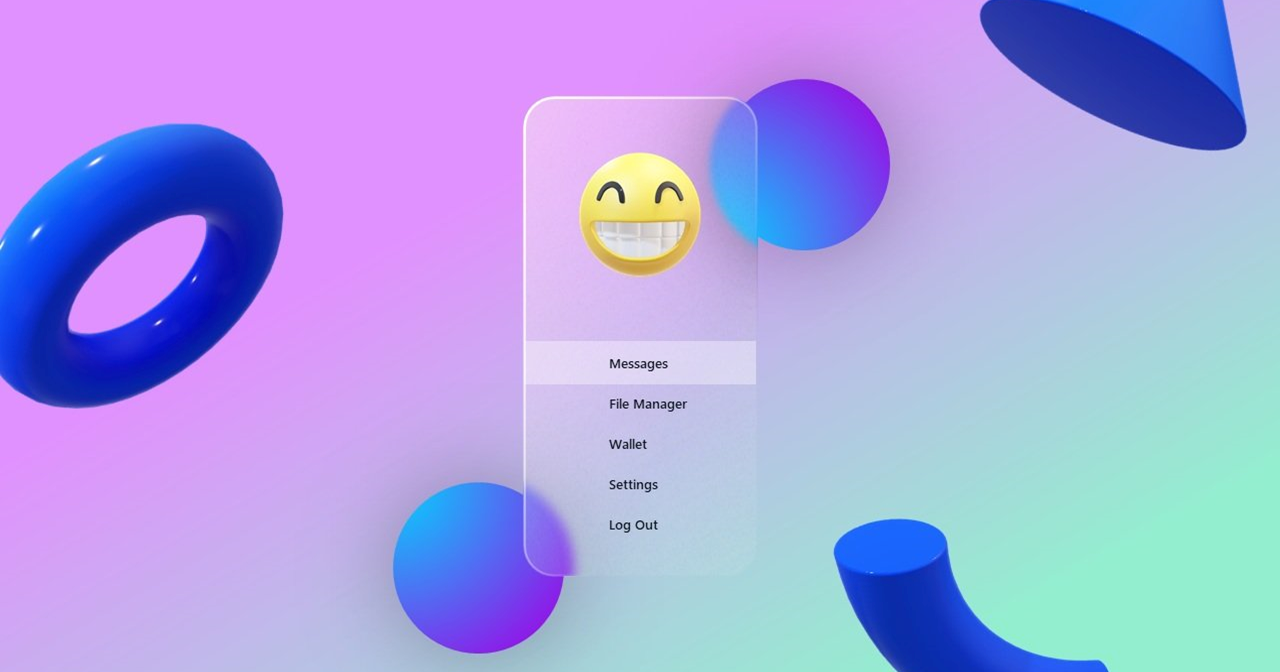
Use the rectangle shape tool to create the frosted glass (Shape 1).
Set Shape 1 fill to ‘Picture or texture fill’ and set the texture to ‘newsprint’ (transparency 85%).
Add a linear-diagonal gradient outline to Shape 1. Set top-left corner to white (position 0%, transparency 0%) and bottom-right corner to white (position 60%, transparency 100%)
Duplicate (CTRL+D) Shape 1 to create Shape 2. Set Shape 2 to liner-diagonal gradient fill with top-left corner in white (position 0%, transparency 0%) and bottom-right corner in white (position 60%, transparency 100%)
Insert text to Shape 2. Use text-box margins to position your copy.
Insert any headshot image and crop to ratio to 1:1, circle.
Use the rectangle shape tool to create a white bar (Shape 4). Set transparency to 70%.
Align and layer your pieces
Layer your elements in the following order:
Layer 1 (bottom) — Shape 4
Layer 2 — Shape 1
Layer 3 — Shape 2
Layer 4 (top) — Headshot image
Give your frosted glass object some depth
Use the oval shape tool to create a circle. Set a radial-diagonal gradient fill, and two new colors.
Add a drop shadow to your shape (transparency 70%, size 100%, blur 50%, angle 45 degrees, distance 3pt).
Copy and paste shape as an image and apply a blur effect (Picture Format > Artistic Effect > Blur).
Crop 70% off of blurred image (use our image as a reference) and layer it over your original shape. Scale the blurred image up by 5%.
Group the two objects (the circle shape and the blurred image).
Connect and layer the pieces
Position the grouped circle object behind your frosted glass.
Repeat previous steps to create a second circle.
Add 3D shapes (optional)
Insert 3D shapes (Insert tab > 3D Models > Stock 3D Model > select ‘3D Shapes’ category).
Arrange them around the frosted glass.
Use the rotation button in the middle of the selected 3D shape to spin and rotate.
(Optional) add animation for a more dynamic effect.
Now it’s your turn! Next time you want to ‘wow’ your audience with a breathtaking presentation, revisit this blog and try out this trendy style of Glassmorphism!
REQUIREMENTS
Requires an Office 365 subscription or access to Microsoft PowerPoint
Must be moderately proficient in Microsoft PowerPoint tools
Available for Windows and Mac users
INSPIRED BY OLEKSII KOLOSOV